Types of RV sidewall construction
How your RV walls are made and why you should care


As a seasoned RV owner or a potential RV buyer, you may have an interest in the difference between an aluminium sided or “soft wall” RV and a laminated or “hard wall” unit. You may have seen these descriptions used in a RV brochure or mentioned by a salesperson in a sales pitch at an RV show or dealers lot.
There are a few variations to each sidewall construction process, but basically there are three main types popular today. In addition to the two above, there is the aircraft design found in a very unique and well-known type of trailer.
Most RVs today, regardless of the manufacture or price range, are built using well-proven materials that have outlived some of the earlier, unsuitable materials. Even models in the entry-level range with lesser-priced construction materials can be assembled into a durable, cost-effective, lightweight and long-lasting RV.
Aluminum-sided RVs
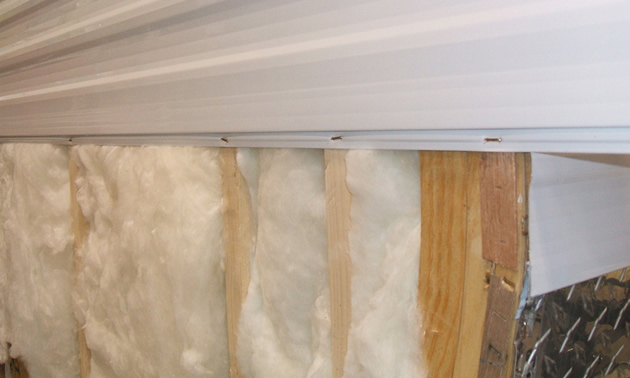
We will start first with the aluminium-sided RV. This is a simple process that can be compared to that of a residential home. You have 2x2 wall studs with interior decorative panelling affixed on one side and fibreglass insulation between that and the exterior aluminium siding, which is installed using an air stapler.
The aluminium siding material is purchased from the manufacturer with different profiles, colors and textures. Some profile options supplied may be called Mesa, Mesa Deluxe, Yoder, etc. Some profiles are manufacturer-specific or brand-name-specific. The colors differ, especially white, which can have many tones. The color may be called Polar White, Peak White, Hornet White or the Colonial White found on many older RVs. The colors may be brand-specific also when various painted striping is added. The textures can vary, but this is usually found on later units with descriptions like Crystal Cote, Stucco or Rough Sawn.
There is a common feature to all the descriptions above and that is the interlocking system built into the siding panels. There is the Pittsburg lock found on older RVs and the smooth or “S” lock used on more recent RVs. With this interlocking feature, the metal is installed at the factory from the top down, and this procedure must be reversed if removal is required to repair any damages. It is not uncommon to require the removal of trim mouldings, windows,entrance doors and other fixtures to access even a small damaged area. Do-it-yourself folk should be aware that the costs are high for material, with crating and freighting charges in addition to the square footage pricing.
Aluminium siding can oxidize or fade over time, but a good quality automotive wax is all that is required to extend the life of the finish. Especially tough on the finish are harsh conditions like that hot Arizona sun, for you snowbirds.
The laminated or bonded process in RV wall construction
The next RV wall construction type is the laminated or bonded process, which requires more steps. The interior wall panel, wood or aluminium framing, polystyrene insulation and exterior wall material (which can be Filon, a plastic-and-fibreglass-combined sheeting) will all be affixed with a strong industrial adhesive and fed through a pinch roller machine at a set PSI pressure. There is an additional process used by some manufacturers that uses a vacuum to remove moisture and air out of the laminated material. With the laminated wall the manufacturer has a seamless, rigid and lightweight product. The exterior finish can be also color-toned on some of the higher-end trailers and motorhomes. The walls are installed to the roof and floor substrate using various techniques to add strength and durability to the unit.
The quality of the exterior wall material has changed greatly over the years. A problem that plagued the RV industry early on was delamination. With this damage, there is water regression in between the wall interior panel, sometimes known as Luan, and the exterior filon sheeting. The moisture will compromise the adhesive and you will see bubbling or warping along the wall surfaces. This type of damage may not be worth repairing in some cases, as replicating the manufacturing process is unattainable. Small punctures or cracks are repairable by your local RV dealer or autobody shop. As with aluminium siding, there are some great cleaning products and specific gel-coat-type waxes available to keep your RV looking brand new.
Full-perimeter design
The last RV wall construction type is more of a full-perimeter or aircraft design. The interior wall structure, which can be aluminium or steel, is usually spray-foam insulated, with individual, preformed sections of aluminium that are riveted to the inner framing. The most common manufacture you will see with this unique look are Airstream trailers. These units can be very expensive to repair, because each panel is specific to the unit and reversing the manufacturing process will require some speciality tools to affix the panels. You won’t be using your Canadian Tire pop-rivet gun on these units.
Eco-friendly building materials
I would like to mention that there are some new, improved composite materials being introduced into the RV industry. The eco-friendly or green industry standards have produced these thermoplastic and recyclable materials. They are also about 20 per cent lighter than other comparable construction products and wood is not used for framing. Some of the new names you will hear are CosmoLite and ComposiTek. These products are just another great move by the RV industry to keep up with customer appeal and environmental concerns.
Although this is a quick overview of RV wall construction, one procedure that is common to all of these types is preventive maintenance. Every season, whether at the spring shakedown or winter storage, you should check all sealant areas and apply a good quality silicone to problem areas. Try to remove loose or cracked sealant first, and then clean or prep the area requiring the sealant. It is quite a disappointment for many RV owners when they contact their insurance provider and find out that dry rot is not covered with their policy.
If you have any questions regarding this article, or just an RV-related enquiry, you can e-mail me.