Preventative maintenance with RV sealants
by
Reg DeYoung
—
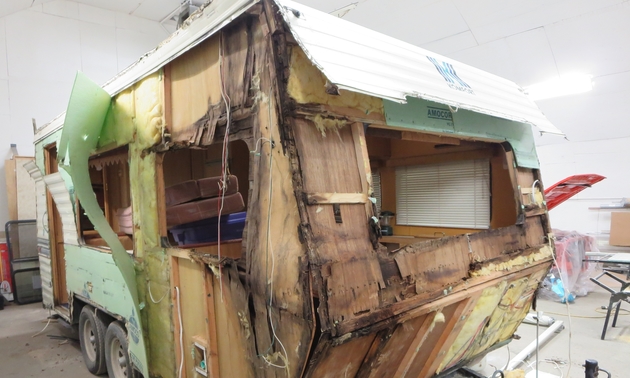


Every season at most RV service centres, there will be customers that bring their RV to the shop with water damage issues.
They may have discovered a soft, spongy floor or roof section, delamination on the exterior filon siding or apparent moisture damage to an interior wall and ceiling panel, which likely has occurred unnoticed for a few years.
It can sometimes be a very frustrating problem trying to locate a water leak, especially after repeated attempts to seal the area eventually leads to an expensive structural repair or a sizable decrease in the resale value of the RV.
Some dealerships will offer a Sealtech system leak test, which would be highly recommended for finding stubborn water leaks. The test works by drawing air in through a roof vent, creating positive pressure in the interior of the RV. After a soapy mixture is sprayed on the exterior components, a bubbling action will determine voids or gaps where water could enter.
Sealants provide a barrier of protection to keep water out and maintain a structural bond between components. However, these products will not last forever and over time will wear out from ultraviolet exposure, extreme temperatures or just normal movement from travelling down the highway.
Steps for maintaining a dry RV with sealants
The first consideration is knowing which sealants offer the best results for each surface. You can research the Internet or talk to an RV parts person at your local RV dealership with questions such as whether the product is suitable for horizontal or vertical applications.
Some manufacturers of RV sealants are Dicor, SikaFlex, Chemtron, LaSalle Bristol, Geocel and Alpha Roof Systems and are very popular stocked items at most RV parts departments.
Before you begin the task, it is advised to wash the entire RV first to allow for a better visual inspection for cracks, gaps or lifting of the existing sealants. You should remove any loose or peeling sealant with a plastic putty knife to protect the siding or roof material, followed by prepping the area with a rubber roof cleaning solution or denatured mineral spirits on the exterior of the RV.
When working on your roof or using ladders, always use extreme caution to avoid a fall. You will need a self-levelling sealant that is compatible with your EPDM or TPO RV roof material. Never use silicone on a rubber or TPO roof as it will not adhere to these surfaces.
In regards to the mouldings, windows and baggage compartments, you should use a polyurethane sealant to provide a flexible and crack-resistant coverage. These products are usually mildew-resistant and paintable.
If a scheduled visual inspection is done every six months, you may find all that is required are minor touch-ups with very minimal costs. Over the years, I have seen many disappointed customers with structural water damage costing thousands of dollars in repairs that could have been avoided with a visual inspection and tube of sealant costing less than $20.