
March 11 began early, as do most of my days. It was still dark outside when I began to assemble the ingredients for a morning fruit smoothie, and when I opened the freezer I found a sloppy bag of defrosted blueberries. It was a rude awakening, and not the first time this happened.
Two years ago the symptoms were the same. Apart from checking gas burners, dusting off the AC wiring connections and giving the cooling pipes several good thumps, all Eric from Starfleet RV could suggest was that I run it on propane for a while to see what happened.
“If it works, we’ll just have to see how long it lasts,” he said.
Well, the cooling resumed and when we switched back to AC, everything was back to normal.
Now all I could do was put as much food as possible into a cooler, check online for today’s prices on new cooling units and fridges and wait for Eric. From earlier discussions, I knew he would recommend a new fridge.
“By the time you’ve bought a new part and paid for more labour time, you’re almost up to the price of new,” he’d say.
Budget-wise, it’s not an impressive choice. A new Dometic fridge with a two-year warranty, plus installation and taxes, comes close to $2,000. An Arcticold cooling unit replacement for my Dometic 3862/RM2852 would be $812, taxes and shipping from New Brunswick included. That unit comes with a lifetime warranty and can be installed in less than an hour, but if extra labour and accessories are required, the bill would not be cheap.
Caught between two costly options, I pulled out the Dometic manual, read it from cover to cover and learned more than I’d ever wanted to know about how cooling units work. In order to produce cold in an absorption refrigerator system, ammonia is liquefied in the condenser coil at the top rear of the fridge. That liquid flows into an evaporator in the freezer section, where it’s exposed to a circulating flow of hydrogen gas—which causes the ammonia to evaporate and create cold in the freezer.
That action-reaction not only requires a continuous movement of ammonia and hydrogen through precisely-slanted coils in the cooling unit, but also creates heat which must be vented—and therein lay two clues to my situation.
The first problem was easiest to remedy: 31-foot fifth wheels are heavy. So while most of my RV sits on concrete, the rear jacks had spent six years settling down into the grass. The RV was now off kilter just enough to interfere with flow in the cooling unit.
The cause of the second problem blew my mind.
When I checked the bottom vent, I just vacuumed up minor dust and a few dead wasps. Then, having read the manual, I turned my back to the wall of the RV and tipped my head back to look way up to the top of the fridge compartment.
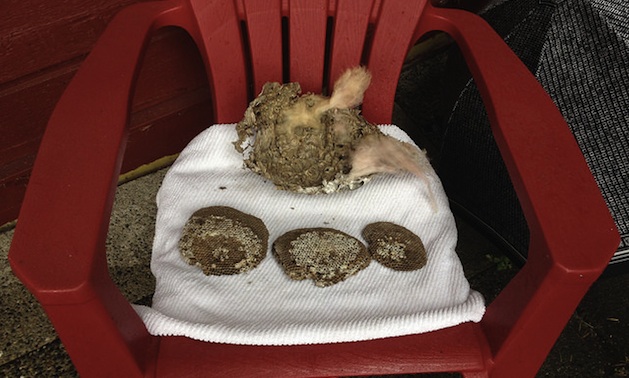
What I saw after those contortions was an abandoned wasp condo which, when Eric arrived to remove it, was nearly 11 inches in diameter and had five honeycomb floors. The wasps had pulled down a large wad of RV insulation, blocking enough of the vent to cause the heat to recirculate and warm up the cooling unit.
Lessons learned. I’m happy to report that, level and wasp-free, my fridge now works as new.
RV maintenance tips
Preventive maintenance (by you or a technician). As with other appliances and components in your RV, there are steps you can take yourself at least twice a year to keep your refrigerator in good working order.
- Check that your RV is level. If you’re on a grass pad, try to site the jacks on stone pavers.
- Check the water levels in your RV batteries and add more water as necessary.
- Every spring and fall vacuum up dust and cobwebs in the appliance storage compartments.
- Check for signs of rodents, bird or insect nests, and make sure no wires have been chewed.
- Gently dust off all electrical and wiring connections.
- Keep the area at the back of the refrigerator clear of obstructions and combustibles.
- Defrost regularly (every two weeks or so). Do not use a hairdryer to speed up the process.
Regular service checks (certified technician only)
For your own safety and the safety of others, the following maintenance should only be performed by certified technicians who are familiar with liquid propane appliances.
- Check and clean gas burners (important even if you run your appliances on AC power).
- Check upper vent and chimney flue. Make sure there are no blockages and/or soot build-up.
- Check colour of flame. Blue is good, yellow means incomplete burning.
- Check auto-switch function from AC to LP.
If in doubt, check with the manufacturer first and blogosphere later. If your DIY efforts end up in trouble, they could void the warranty on your appliance and/or the terms of your insurance policy.
Below is some of the contact information you may find useful:
www.dometic.com
i[email protected]
www.norcold.com
[email protected]
www.norcold/recall.com