RV axle flips 101
Here are some tips for do-it-yourself modifications to install an axle flip on your RV trailer
For those RV enthusiasts that like to take their RV into the backcountry and have a lift kit on the tow vehicle or other clearance concerns—an axle flip will be beneficial and cost-saving.
An axle flip can help prevent possible holding tank, gate valve, stabilizer jack damage or axle component wear from increased weight on the rear axle.
Basically, an axle flip involves removing the axles from the normally mounted position above the springs known as overslung to under the springs known as underslung, which will add clearances of about 4 to 6 inches below the previous frame height from the ground.
Firstly, I would like to discuss this task for a do-it-yourself project without the proper knowledge of electric brake characteristics, proper camber of the axle or limited welding skills.
At our shop we have seen trailers with the drop spindle type axle actually ‘’flipped’’ over upside down to increase ground clearance.
This axle flip attempt will affect braking, tire wear and could be a serious safety concern. The electric brake system has an actuator arm where the brake magnet is mounted and needs to be positioned in front of the axle spindle to function properly.
The axle is designed for expected deflection under added loads in relation to the road surface which is referred to as caster. Having the caster angle upside down will cause premature tire wear.
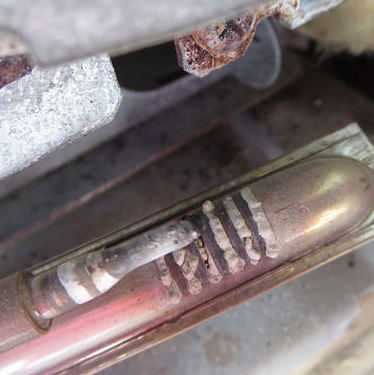
Another issue for do-it-yourself folks is using a torch to cut the existing axle saddles or spring perches off with an acetylene torch to be used for the new axle position. If the axle tube is burnt through the integrity of the axle will be compromised.
Lastly, you should never use the existing U-bolts to complete an axle flip. It is advisable to put new U-bolts and torque to the manufactures specified torque settings.
Your local RV service centre will usually have all the equipment available to complete the job and the costs for labour and parts can be quite reasonable. This would also be an excellent time to check the rest of the suspension such as bearings, shoe linings and hubs.
Some considerations that may be overlooked after an axle flip are: adjustments to the pin box height for proper box clearances, changing the step size to a two- or three-step assembly, modifying the shock mounts at the tie plates and frame to accommodate the new shock angles and adjusting the ball mount height.
After an axle flip has been completed it is advisable to check the U-bolts, shackle and equalizer bolts for proper torque settings after the first 90 kilometres or 50 miles.