Ready to try cold weather RVing?
Tips for living in your RV during the winter months
For most folks adding RV antifreeze to the water system, finding a suitable location for extended storage and locking the deadbolt is “winterizing” their RV. If you plan on full-timing in your RV, then winterizing takes on a whole new role with some extra efforts and costs.
The average RV is not designed for cooler temperatures, especially when it drops below 0°C. The water and holding tanks are bolted under the RV, with very little protection from the elements at all. The wall construction of an aluminum sided RV are not suitable for the winter months.
Most RV’s are manufactured for warmer temperatures and less frequent use. There are some manufacturers that offer a winter or polar package which will include such options as heated dump valve and tank enclosures, thermal pane glass and electric forced air fireplaces, etc. and this will provide some added protection from the cooler temperatures, but there are many other preparations required to provide a comfortable living space for the occupants, including your pets.
Taking it from the top
Let’s start right at the top, in other words, the roof. It is very important to ensure that the roof and fridge vents, sewer caps, etc. are all in good condition and all areas are properly sealed. You can further protect the roof vents and enhance ventilation by installing roof vent covers on your RV.
The exterior water system starts with the fresh water hose connection and 110-volt heat tape will need to be wrapped around the hose and insulated with foam pipe wrap or fibreglass insulation tightly wrapped with electrical tape. I have been told that wrapping the pipe with aluminum foil first will help with heat transfer. You should get the tape as close to the city water inlet as you can and read the instructions on the heat tape with respects to exposing the heat tape temperature sensing device for the best results.
An area that is often overlooked is the optional exterior shower enclosure, not only is it an area that can allow outside cold air to enter the interior, it can also freeze up and damage the faucet. I have seen an RV in which the owner installed shut-off valves near the fixture to isolate the outside shower from the rest of the water system and then packed insulation into the outside access enclosure.
Look down
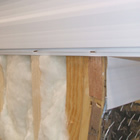
Another aspect is the underside of the RV. It is advisable to add some sort of skirting which can be constructed in numerous ways depending on the severity of the winter. You can use OSB (chipboard) with the addition of Styrofoam SM to get the best R-value, make sure you leave some room for expansion and contraction and don’t install the skirting too tight to the ground. A better solution is to have a custom-fitted vinyl material cut to surround the RV and install it with twist snaps on the side. The removal will be quick in the spring and storage will be much easier.
The water and holding tanks that are located in the basement area are usually heated from the furnace ductwork and can withstand cooler temperatures very well. If the tanks are located in the underside framework, they will need suitable protection.
There are a couple of choices in this area too. You can install heat pads to each tank, which are set up to be supplied by 110 volts or 12 volts. The 12-volt is normally used while travelling and the 110 is used for extended parking for longer periods of time. If you follow with professionally installed spray foam insulation, this should provide an excellent addition to the wintering package. You can also construct a wood enclosure around the tanks with added styrofoam and a furnace ductwork line to the tank area. Be sure and install a return air grill in the floor near the tanks to improve the heating characteristics.
Other things to consider
You should keep the black and grey water gate valves closed until it is time to dump the tanks, and heat should be applied to the valves at all times. If there is a long run of ABS pipe to the outlet then heat tape should be applied there also. There is nothing worse then pulling the valve handle and having it break inside the assembly from being frozen.
The sewer hose that was provided when you purchased your RV will not withstand the cold temperatures. It will split or crack and make quite a mess. You’ll need a solid ABS or PVC pipe from the gate valve to the sewer discharge area.
The windows in the average RV are a simple single pane slider that are not sealed all that well from drafts and high winds. You must install some sort of covering to keep the heat in and the cold out. You can apply a heat shrink type of material over the glass trim ring or have some custom cut plexiglass or Lexan installed with clips or Velcro. You should leave at least one window at each end of the RV untouched or operable for those warmer days when you wish to air out the living area. We’ll continue in the next newsletter with the interior aspects of winter living in your RV, as well as some winterization tips for propane tanks and slide-outs.